This article will show you how to use Raspberry Pi and the 5V relay switch to turn a lightbulb on and off from your mobile device. The article includes a web app that you can access from any device on your network and control any AC home appliances in your home wirelessly. So, let us get started with our simple Raspberry Pi home automation experiment.
Things You Will Need
If you want to use your Raspberry Pi headless (via SSH or VNC), you will need the following things:
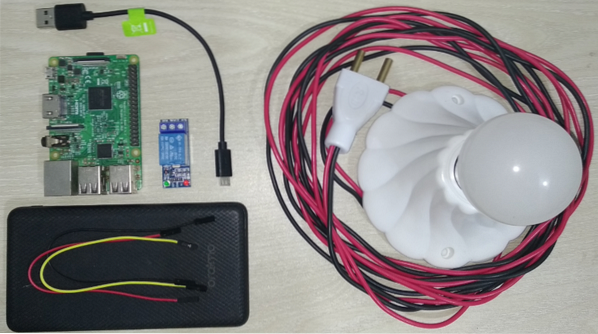
1) Raspberry Pi 3 or Raspberry Pi 4.
2) 5V Relay switch.
3) Electrical wires.
4) 3 female-to-female connecting wires.
5) AC lightbulb.
6) AC lightbulb holder.
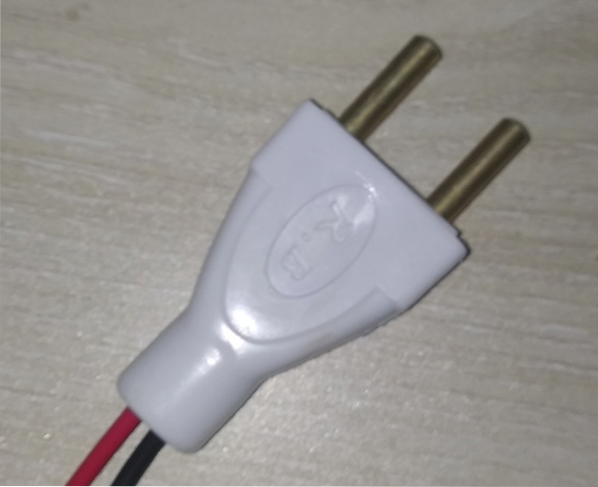
7) AC plug.
8) Wirecutter and stripper tool.
9) CR-V 3 screwdriver.
10) Micro-USB (Raspberry Pi 3) or USB Type-C (Raspberry Pi 4) power adapter.
11) 16 GB or 32 GB microSD card with Raspberry Pi OS flashed.
12) Network connectivity on Raspberry Pi.
13) Laptop or a desktop computer for VNC remote desktop access or SSH access to Raspberry Pi.
If you do not want to access Raspberry Pi remotely via SSH or VNC, you will also need the following:
14) A monitor.
15) HDMI or micro-HDMI cable.
16) A keyboard.
17) A mouse.
If you need assistance with flashing the Raspberry Pi OS image to the microSD card, check out the article How to Install and Use Raspberry Pi Imager.
If you are a Raspberry Pi beginner and you need assistance with installing Raspberry Pi OS on Raspberry Pi, check out the article How to Install Raspberry Pi OS on Raspberry Pi 4.
Also, if you need assistance with the headless setup of Raspberry Pi, check out the article How to Install and Configure Raspberry Pi OS on Raspberry Pi 4 Without External Monitor.
Images of all the required tools are given below.


Powering on Raspberry Pi
Next, connect the power cable to Raspberry Pi and power on Raspberry Pi.
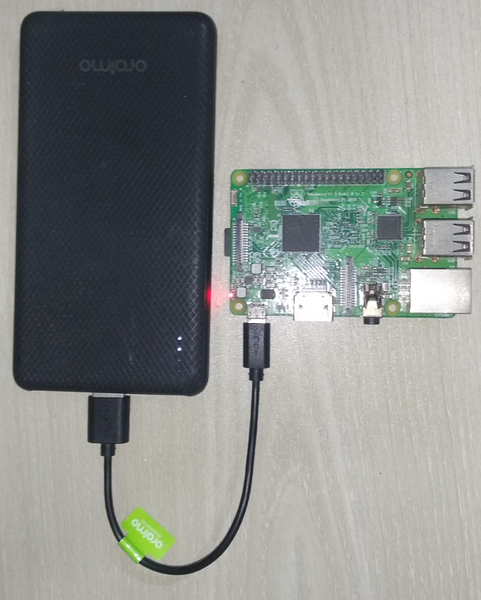
Once Raspberry Pi is powered on, you can connect to Raspberry Pi via VNC or SSH. Or, you can connect a keyboard, a mouse, and a monitor to Raspberry Pi to directly access it.
5V Relay Pinouts
A relay is basically a switch. But, unlike a traditional switch, a relay can be controlled by a small amount of DC voltage.
The 5V relay is very easy to use. It has two sides: one side is used to control the relay via low-voltage DC (from Raspberry Pi), and the other side is used to control the high voltage AC (i.e., the lightbulb), depending on the state of the relay.
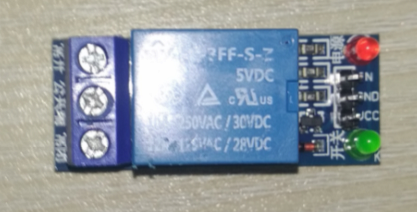
On one side, the relay has two LEDs (one red and one green) and three pins (IN, GND, and VCC). These three pins are used to control the relay from Raspberry Pi.
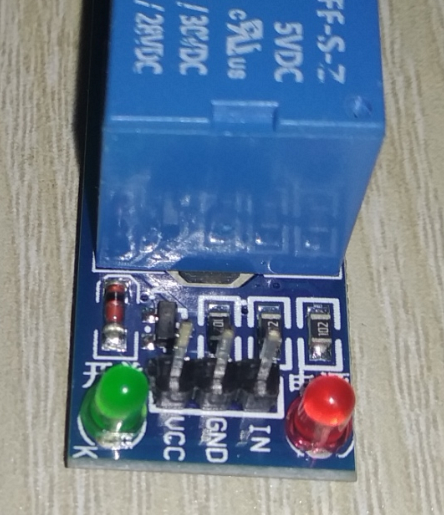
The first two pins on the other side are used to control the AC home appliance.
Connecting the 5V Relay to Raspberry Pi
To connect the 5V relay to Raspberry Pi, you will need three female-to-female connecting wires.
Plug one side of the connecting wires to the IN (yellow wire), GND (black wire), and VCC (red wire) pins in the 5V relay, as shown below.

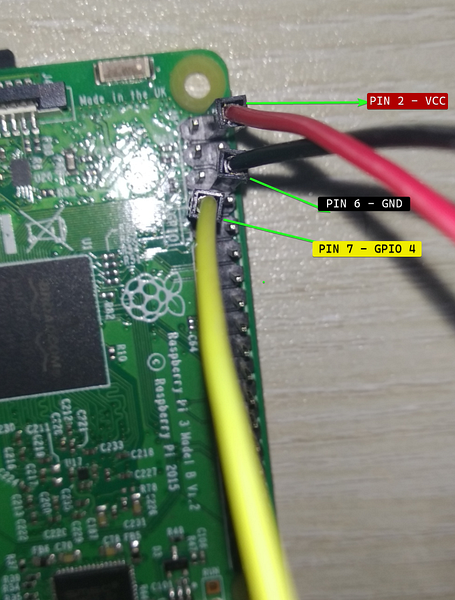
The other side of the wires goes into the GPIO header pins of Raspberry Pi, as shown in the image below.
The red wire should go into the PIN 2 (VCC) of Raspberry Pi.
The black wire should go into the PIN 6 (GND) of Raspberry Pi.
The yellow wire should go into the PIN 7 (GPIO 4) of Raspberry Pi.
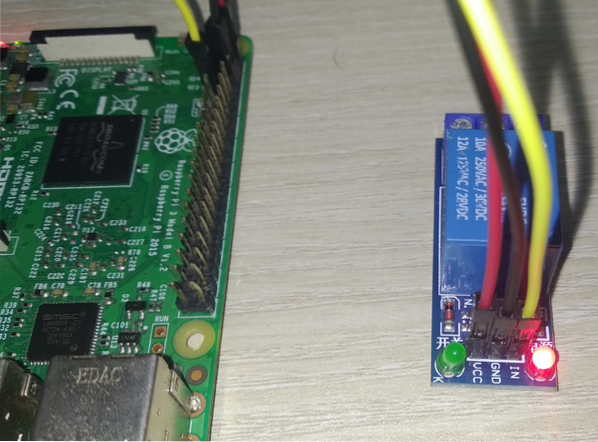
Once the 5V relay is connected to Raspberry Pi, it should look as shown in the image below.
Allowing GPIO Access to Login User
To allow access to the GPIO pins, the default login user of Raspberry Pi OS pi should be added to the gpio group.
You can add the pi user to the gpio group with the following command:
$ sudo usermod -aG gpio $(whoami)
For the changes to take effect, reboot Raspberry Pi with the following command:

Creating a Project Directory
It is also a good idea to keep all the project files organized.
To keep the project files organized, create the project directory ~/www and the required subdirectories with the following command:
$ mkdir -pv ~/www/templates,static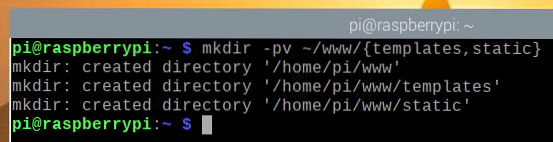
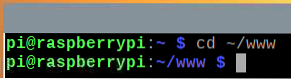
Once the project directory is created, navigate to the project directory as follows:
Switching the 5V Relay from Raspberry Pi
Now that you have connected the 5V relay to Raspberry Pi, you will switch the relay from the Raspberry Pi using the Python programming language.
NOTE: Switching is a term used in electronics. Switching means controlling (i.e. powering on/off) a certain electronic device.
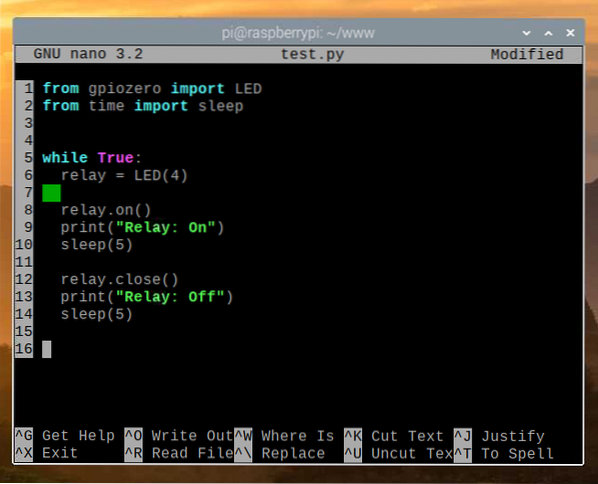
To experiment with switching the relay using the Python programming language, create the new Python script test.py in the project directory as follows:
$ nano test.py
Type the following lines of codes in the test.py Python script.
from time import sleep
while True:
relay = LED(4)
print("Relay: On")
sleep(5)
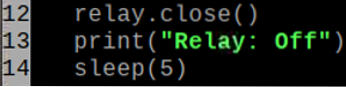
relay.close()
print("Relay: Off")
sleep(5)
Once you are done, press
Here, line 1 imports LED from the gpiozero library, and line 2 imports the sleep function from the time library.

Lines 6-14 are within an infinite loop.
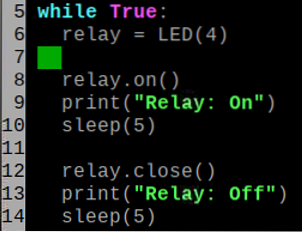
Line 6 initializes an LED in the GPIO 4 of Raspberry Pi, which is connected to the IN pin of the relay.

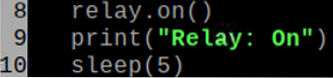
Line 8 turns on the relay using the on() method.
Line 9 prints a message in the console using the print() function.
Line 10 delays the execution of the next line of code for five seconds using the sleep() function.
Line 12 turns off the relay using the close() method.
In the same way, line 9 prints a message on the console using the print() function and line 10 delays the execution of the next line of code for 5 seconds using the sleep() function.
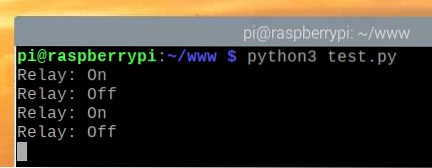
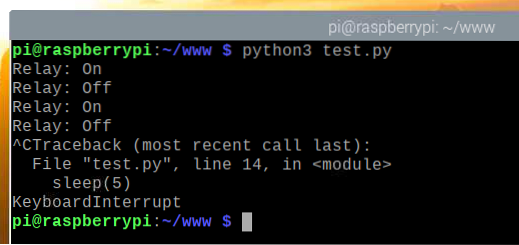
Next, run the test.py Python script as follows:

The test.py Python script should start switching the 5V relay. You should hear a clicking sound every five seconds. When the relay switches state (from on to off or from off to on), it makes a clicking noise. This means that the relay is functioning properly.
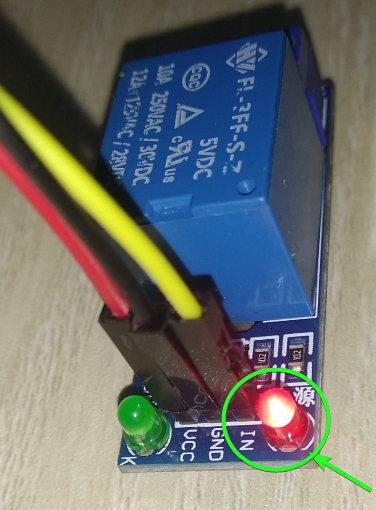
When the relay is in the off-state (normal operation - AC load is disconnected), only the red LED should light up, as you can see in the image below.
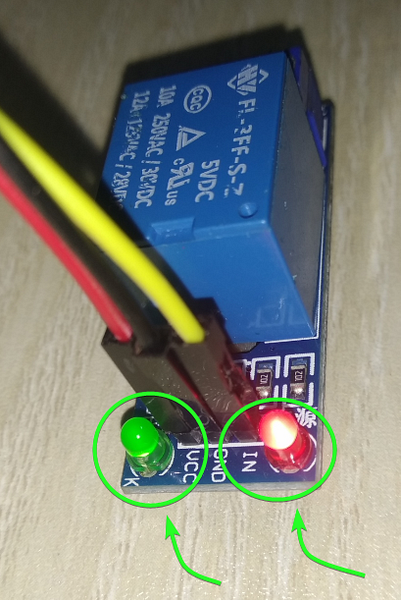
When the relay is in the on-state (AC load is connected), both the green LED and the red LED should light up, as you can see in the image below.
Once the testing is complete, press

Connecting the AC Lightbulb to the 5V Relay
The 5V relay should now be functioning properly. Now, you will connect your AC home appliance (a lightbulb, in this case) to the 5V relay.
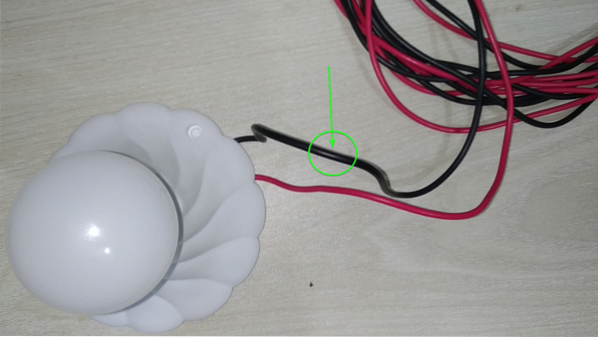
First, cut the black electrical wire connected to the lightbulb with a wirecutter.
Once the black electrical wire connected to the lightbulb has been cut with a wirecutter, it should look as shown in the image below.

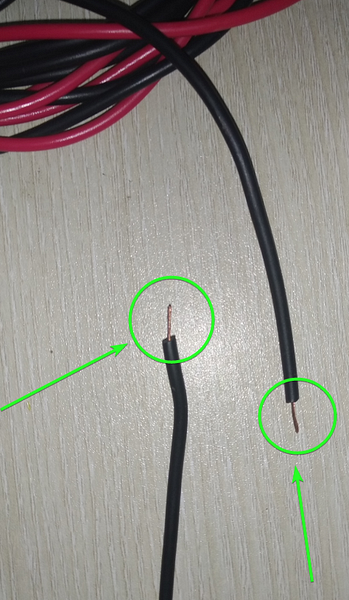
Next, strip away the exterior layer to expose about ½ inch of the electrical wire, as shown in the image below.
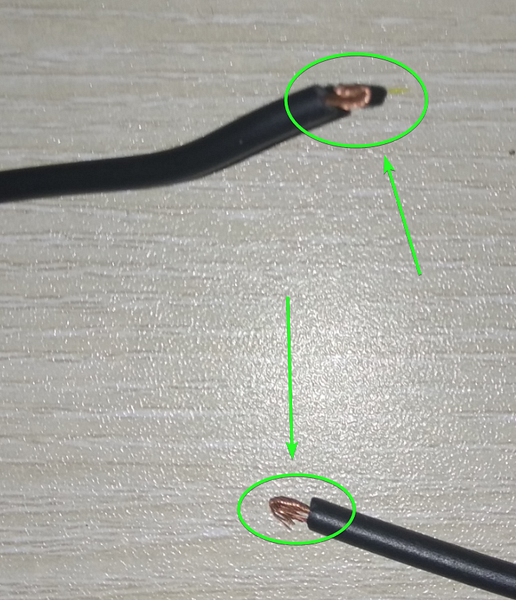
Then, fold the exposed wires, as shown in the image below.
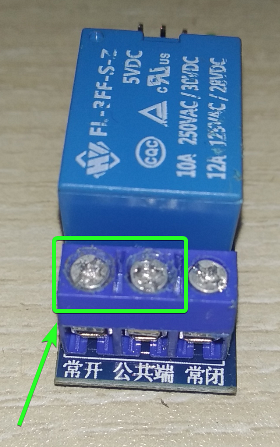
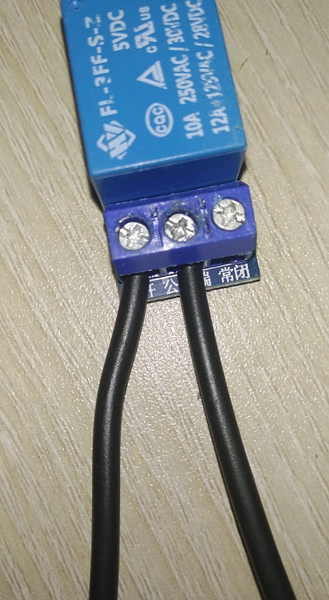
Loosen the marked screws of the relay with a CV-3 screwdriver.
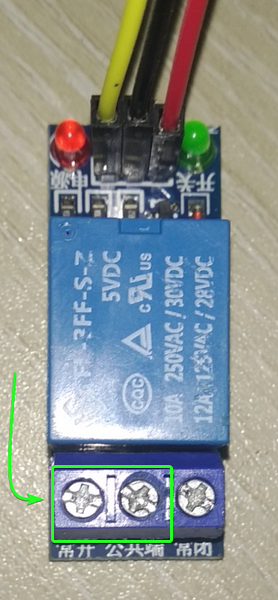
Insert the exposed wires that you stripped and folded earlier in the two screw terminals and tighten the screws with a CV-3 screwdriver.
Testing Relay Switching After Connecting AC Load
Once the AC load is connected to the 5V relay, connect the lightbulb plug to the wall socket.
Run the test.py Python script from the project directory as follows:

The test.py Python script should start switching the 5V relay, which, in turn, will switch the high voltage AC lightbulb at five-second intervals. The AC lightbulb should stay on for five seconds, then stay off for five seconds, and so on.
The lightbulb is off in the image below.

The lightbulb is on in the image below.

As you can see, we can switch the relay and control the high voltage AC lightbulb using the Python programming language. So, press
 Let us now move on to the next section.
Writing the Home Automation Web App
In this section, I will show you how to write an API-based web app using the Python programming language. You can use the web app to control the relay and the AC home appliance(s) or electrical device(s) connected to the relay from a web browser.
NOTE: All the codes shown in this section are available in my GitHub repository shovon8/raspberry-pi-home-automation. If you want, you can clone my GitHub repository and skip all the codes.
Create the server.py Python script in the project directory as follows:
$ nano server.py
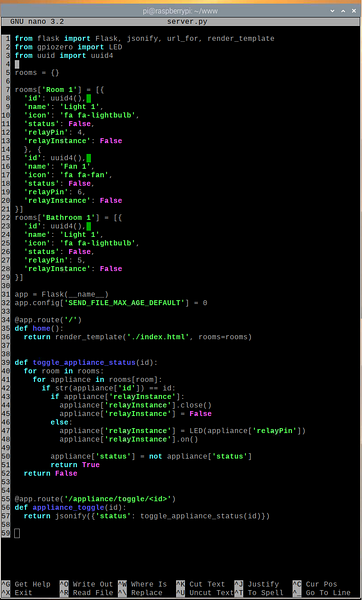
Type the following lines of codes in the server.py Python script.
from gpiozero import LED
from uuid import uuid4
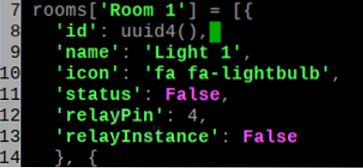
rooms =
rooms['Room 1'] = [
'id': uuid4(),
'name': 'Light 1',
'icon': 'fa fa-lightbulb',
'status': False,
'relayPin': 4,
'relayInstance': False
,
'id': uuid4(),
'name': 'Fan 1',
'icon': 'fa fa-fan',
'status': False,
'relayPin': 6,
'relayInstance': False
]
rooms['Bathroom 1'] = [
'id': uuid4(),
'name': 'Light 1',
'icon': 'fa fa-lightbulb',
'status': False,
'relayPin': 5,
'relayInstance': False
]
app = Flask(__name__)
app.config['SEND_FILE_MAX_AGE_DEFAULT'] = 0
@app.route('/')
def home():
return render_template('./index.html', rooms=rooms)
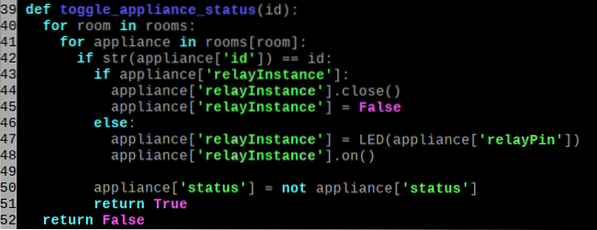
def toggle_appliance_status(id):
for room in rooms:
for appliance in rooms[room]:
if str(appliance['id']) == id:
if appliance['relayInstance']:
appliance['relayInstance'].close()
appliance['relayInstance'] = False
else:
appliance['relayInstance'] = LED(appliance['relayPin'])
appliance['relayInstance'].on()
appliance['status'] = not appliance['status']
return True
return False
@app.route('/appliance/toggle/
def appliance_toggle(id):
return jsonify('status': toggle_appliance_status(id))
Once you are done, press
Here, lines 1-3 import all the necessary components from their respective libraries.

Line 5 creates an empty rooms dictionary. In this dictionary, we will store all the AC appliance details that we want to control from the web app.

The rooms details are stored in lines 7-29.
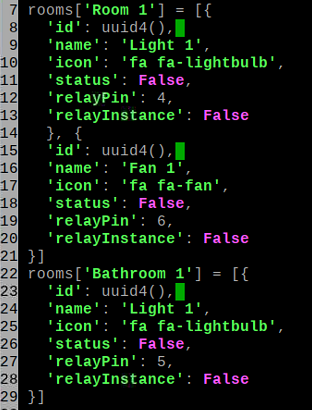
Let us discuss the data structure of one of the rooms.
Here, the room name will be Room 1. So, Room 1 is the key to the rooms dictionary.

The Room 1 key holds an array as the value. The number of array elements is equal to the number of AC home appliances you have in that room that you also want to control from the web app. In this case, we have two AC home appliances that we want to control: Light 1 and Fan 1.

Each home appliance definition has an id. The id is a randomly-generated UUID. This is used to identify which room we want to control using the API.
A home appliance also has all of the following:
- name (Light 1 in this case)
- icon (Font Awesome icon class, as we will be using Font Awesome for the icons)
- status (True if on and False if off)
- relayPin (the GPIO pin number used to control the relay connected to the AC home appliance)
- relayInstance (the initialized LED object of gpiozero library responsible for controlling the respective GPIO pin - relayPin)
Line 31 initializes a flask Python web server.
Line 32 configures the flask web server.

Lines 34-36 send the index.html file from the templates/ directory when you visit the home automation web app.
Flask uses Jinja2 templating language to render the index.html file. So, I have passed the rooms dictionary to the index.html file. Jinja2 will render the homepage using the rooms data.

The function toggle_appliance_status() in lines 39-52 is used to turn on the home appliance if it is off and turn off the home appliance if it is on using the appliance's id.
It returns True if the toggle operation is successful. If there is an error, it will return False.
Lines 55-57 are used to toggle a home appliance using the /appliance/toggle/ API endpoint of the webserver. Here, id is the ID of the home appliance.

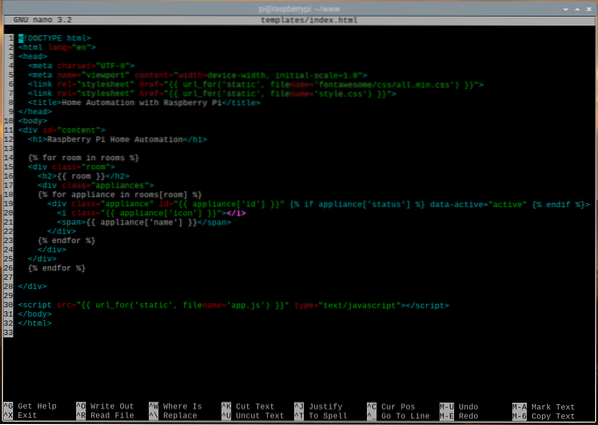
Create the index.html file in the templates/ directory of your project as follows:

Type the following lines of codes in the index.html script.
Raspberry Pi Home Automation
% for room in rooms %
room
% for appliance in rooms[room] %
appliance['name']
% endfor %
% endfor %
Once you are done, press
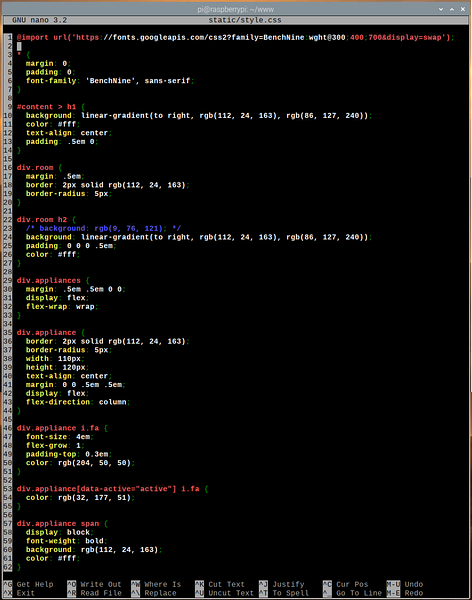
Create a style.css file in the static/ directory of your project as follows:

Type the following lines of codes in the style.css file.
*
margin: 0;
padding: 0;
font-family: 'BenchNine', sans-serif;
#content > h1
background: linear-gradient(to right, rgb(112, 24, 163), rgb(86, 127, 240));
color: #fff;
text-align: center;
padding: .5em 0;
div.room
margin: .5em;
border: 2px solid rgb(112, 24, 163);
border-radius: 5px;
div.room h2
/* background: rgb(9, 76, 121); */
background: linear-gradient(to right, rgb(112, 24, 163), rgb(86, 127, 240));
padding: 0 0 0 .5em;
color: #fff;
div.appliances
margin: .5em .5em 0 0;
display: flex;
flex-wrap: wrap;
div.appliance
border: 2px solid rgb(112, 24, 163);
border-radius: 5px;
width: 110px;
height: 120px;
text-align: center;
margin: 0 0 .5em .5em;
display: flex;
flex-direction: column;
div.appliance i.fa
font-size: 4em;
flex-grow: 1;
padding-top: 0.3em;
color: rgb(204, 50, 50);
div.appliance[data-active="active"] i.fa
color: rgb(32, 177, 51);
div.appliance span
display: block;
font-weight: bold;
background: rgb(112, 24, 163);
color: #fff;
Once you are done, press
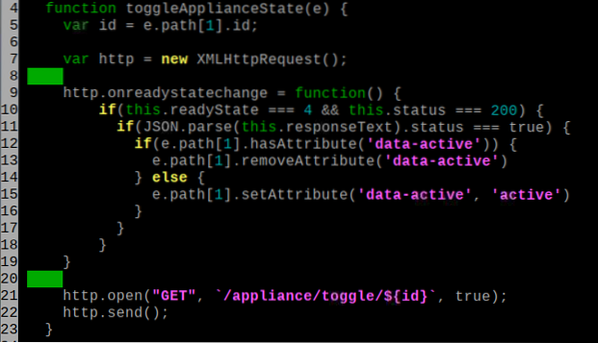
Create an app.js file in the static/ directory of your project as follows:

Type the following lines of codes in the app.js file.
function main()
function toggleApplianceState(e)
var id = e.path[1].id;
var http = new XMLHttpRequest();
http.onreadystatechange = function()
if(this.readyState === 4 && this.status === 200)
if(JSON.parse(this.responseText).status === true)
if(e.path[1].hasAttribute('data-active'))
e.path[1].removeAttribute('data-active')
else
e.path[1].setAttribute('data-active', 'active')
http.open("GET", '/appliance/toggle/$id', true);
http.send();
var appliances = document.getElementsByClassName('appliance');
for(i=0; i < appliances.length; i++)
appliances[i].addEventListener('click', toggleApplianceState);
Once you are done, press
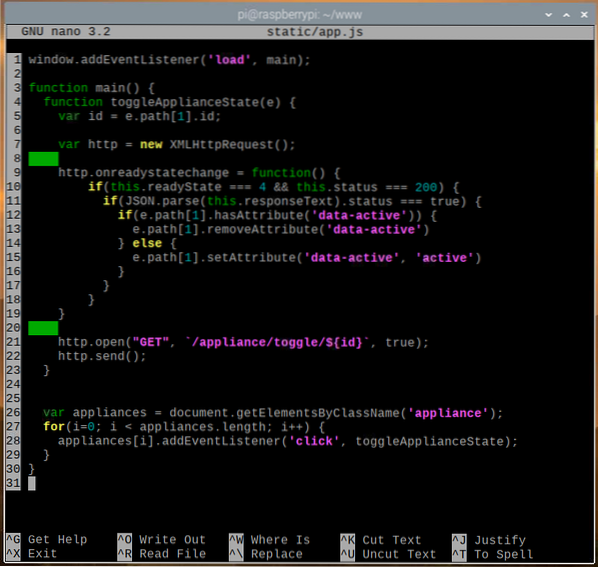
Here, line 1 runs the main() function when the web page finishes loading.

In the index.html file, each home appliance is enclosed in an appliance class. Lines 26-29 are used to select each home appliance from the web page and attach the click event to the appliance. When someone clicks on a home appliance from the web page, the toggleApplianceState() function will run.

In lines 4-23, the toggleApplianceState() function is used to request the /appliance/toggle/ endpoint of the webserver to change the state of the clicked home appliance. The request is made in the background via AJAX. Once the response is received, the web page is updated accordingly.
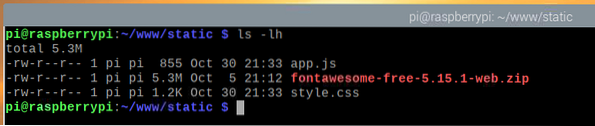
Navigate to the static/ directory in your project directory as follows:
Download Font Awesome with the following command:
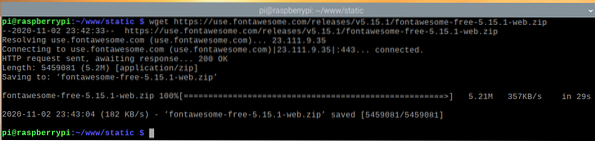
Once Font Awesome is downloaded, you should find the new zip file fontawesome-free-5.15.1-web.zip in the static/ directory.
Unzip the fontawesome-free-5.15.1-web.zip file with the following command:

The fontawesome-free-5.15.1-web.zip file should now be unzipped.
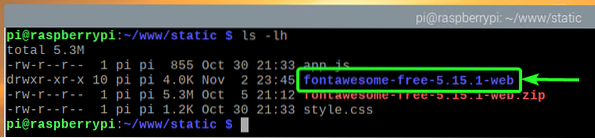
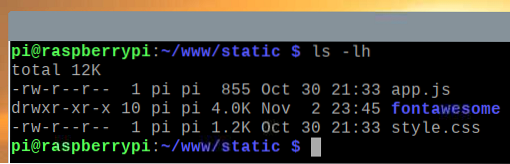
The new directory fontawesome-free-5.15.1-web/ should be created in the static/ directory, as you can see in the screenshot below.
Rename the directory fontawesome-free-5.15.1-web/ to fontawesome/ with the following command:
$ mv -v fontawesome-free-5.15.1-web fontawesome
Now, you no longer need the fontawesome-free-5.15.1-web.zip file. So, remove the fontawesome-free-5.15.1-web.zip file with the following command:

The static/ directory structure should look as shown in the screenshot below.
Navigate back to the project directory ~/www as follows:
Testing the Home Automation Web App
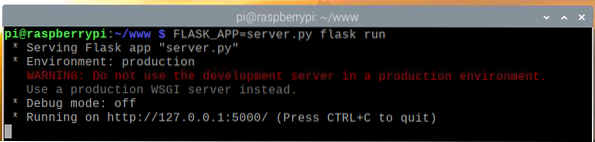
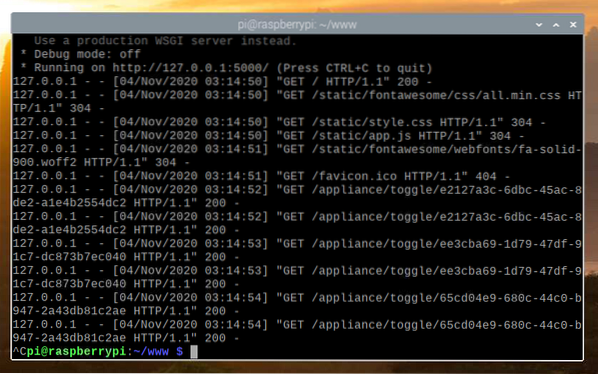
To test the home automation web app, run the following command in your project directory:
$ FLASK_APP=server.py flask run
The web app should be available on port 5000 of your Raspberry Pi.
From the Chromium web browser, visit http://localhost:5000. The home automation web app should load.
Click on the lightbulb icon, indicated in the image below.
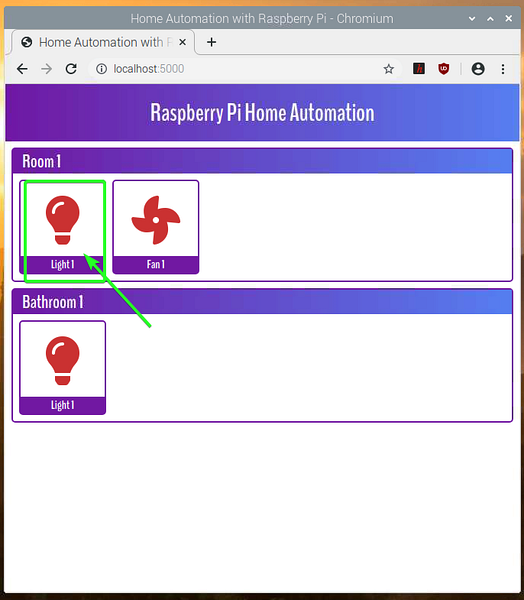
The AC lightbulb should now be turned on. The icon color should also change to green, indicating that the lightbulb is on.
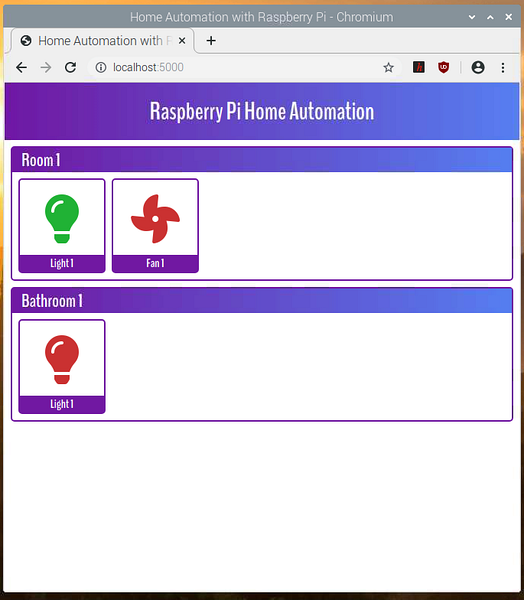
So, the home automation web app is working. Press
Creating Systemd Service for the Home Automation Web App
In this section, I will show you how to create a systemd service file for the home automation web app so that it will automatically start on boot.
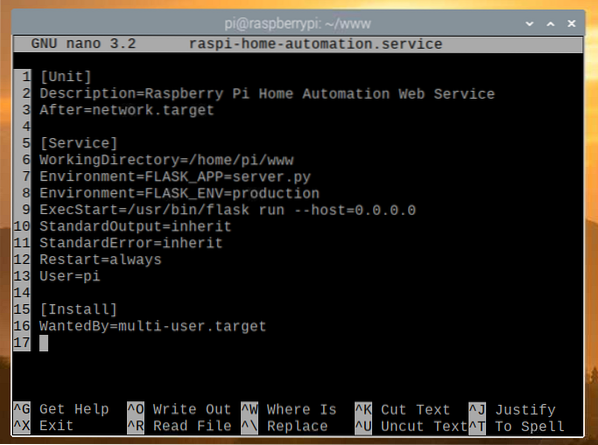
First, create the raspi-home-automation.service file in your project directory as follows:
$ nano raspi-home-automation.service
Type the following lines in the raspi-home-automation.service file.
[Unit]Description=Raspberry Pi Home Automation Web Service
After=network.target
[Service]
WorkingDirectory=/home/pi/www
Environment=FLASK_APP=server.py
Environment=FLASK_ENV=production
ExecStart=/usr/bin/flask run --host=0.0.0.0
StandardOutput=inherit
StandardError=inherit
Restart=always
User=pi
[Install]
WantedBy=multi-user.target
Once you are done, press
Copy the raspi-home-automation.service file to the /etc/systemd/system/ directory with the following command:

Reload the systemd daemons for the changes to take effect as follows:

Add the raspi-home-automation service to the system startup of Raspberry Pi OS with the following command:

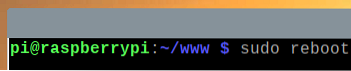
Reboot Raspberry Pi with the following command:
Once Raspberry Pi boots, the raspi-home-automation service should be active/running, as you can see in the screenshot below.

Accessing the Home Automation Web App from Other Devices
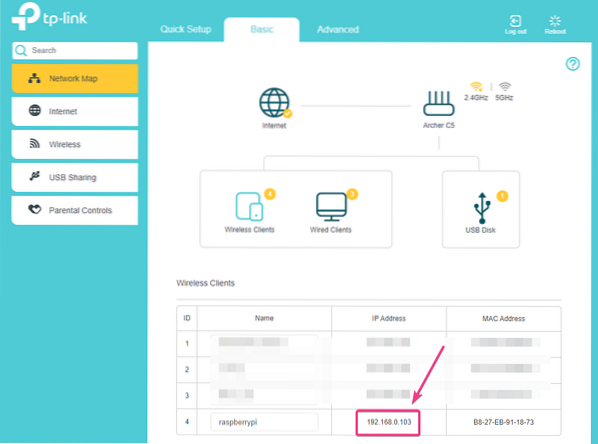
To access the home automation web app from other devices in your home network, you will need to know the IP address of your Raspberry Pi device.
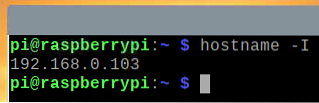
You can find the IP address of your Raspberry Pi 4 device from the web management interface of your home router. In my case, the IP address is 192.168.0.103. This will be different for you. So, be sure to replace my IP with yours from now on.
If you have access to the Raspberry Pi console, you can run the following command to find the IP address, as well.
Once you know the IP address of your Raspberry Pi device, you can access it from any device in your home network.
As you can see in the screenshot below, I have accessed the home automation web app from my Android smartphone.
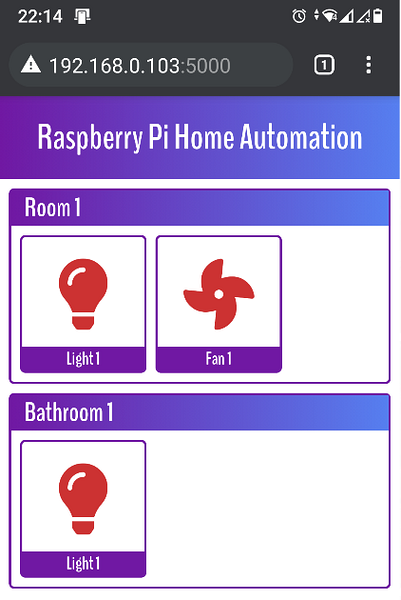
Be sure to plug the lightbulb plug into the wall power outlet.

The lightbulb should be switched off by default.

If you tap the lightbulb icon from the home automation web app, the lightbulb icon color should change to green, indicating that the lightbulb is on.
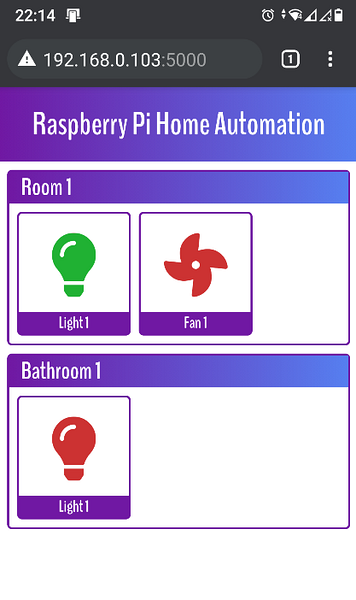
As you can see in the image below, the lightbulb is on.

Conclusion
This article showed you how to use a 5V relay to control a high-voltage AC electrical device from Raspberry Pi using the Python programming language. The article also showed you how to write an API based Python flask web app to control the relay from the web browser. This article should help you get started with home automation using Raspberry Pi.


